

October 31, 2010
Jack O' Lantern Kitty
Last night after the twins were ready for bed, we lit the jack o' lantern I had cut out earlier in the afternoon. The patten I used was a kitty, Kinsauls love kittens (except me) lol, so what could be more perfect than a kitty on our pumpkin?!
 Both boys were loving the glow from the candle. David kept saying, "meow, meow", I kept saying, "meow, kitty says, meow". By the end of the night I was hoping that our children weren't thinking that pumpkins are kittens and that they say, "meow". lol

Halloween Play Dough
So, I tried the store bought play dough with my little ones and they were beyond grossed out by the smell of it. With that, I looked online at some different homemade play dough recipes and found one to try. It was so easy to put together. I was concerned at first about the food coloring coming off on things and staining our hands but it didn't do that at all. This play dough still smells a little different but it's much better smelling than the store bought stuff. Funny story though, even without the bad odor my two still didn't want to play with it. lol Oh well, there's always next time!
After making my first batch I thought I'd put together some for Halloween treats to give to B & F's little friends. Here's the instructions on how I made them!


After making my first batch I thought I'd put together some for Halloween treats to give to B & F's little friends. Here's the instructions on how I made them!

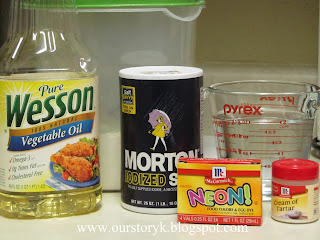
Colored Play Dough
1 c. water
1 T. vegetable oil
1/2 c. salt
1 T. cream of tarter
food coloring
saucepan
1 1/4 c. flour, plus extra

Combine water, oil, salt, cream of tarter and food coloring in a saucepan
and heat over medium heat until warm.
Side note: The cream of tarter makes this dough last 6 months longer, so resist the temptation to omit it.
Remove from heat and add flour.

Stir in flour, then knead on a floured surface until smooth.

Store the dough in an airtight container.

Because I'm going to give these out, I chose to divide the dough into smaller portions.
I used small Ziploc containers to keep it airtight.

These are cute but I wanted to make them really special for Halloween.
I used some scrapbook paper cut into circles and used my Slice to cut out jack o' lantern pumpkins.
Printed and cut out some tags and used twine to tie them all together.


I love how they turned out! Spooky fun!
October 28, 2010
My Crafting/Scrapbooking Essentials

I thought I'd share with you all my craftting/scrapbooing essentials, my "must haves" if you will.
1. A good sharp paper trimmer. I'd be lost with out this, the best way to get straight edges.
2. Quality, acid free, photo safe scrapbook paper. I keep a pretty large stock of this.
3. A sharp pair of scissors.
4. Acid free, photo safe adhesive. I like the scotch brand but really any good quality one will do.
5. Stamps, whether clear or block. The alphabet ones are awesome and I love that you can use them over and over, unlike stickers.
6. Stickers. lol I do love these as well and the alphabet ones are my favorite. What can I say.....I love them both equally.

7. Acid free, photo safe ink for stamping.
8. Distress ink. This is one of my all time favorite things to use on the edges of scrapbook pages and cards.
9. Clear stamping block for using the clear stamps. These are great because you can see what's underneath before you stamp it down.
10. Acrylic paint. You never know when you might need a little!
11. Mod Podge. This is an amazing product. I highly recommend it!

12. Paper punches.
13. Clear stencils. I have had these for so long. The ones in stores now are completely different but work the same.
14. Twine. This is what I used to keep the "cardboard album" together.
15. Small pliers. These are great for twisting the ends of florist's wire.
16. An assortment of ribbon.
17. Pieces of cardboard and/or chip board. Different sizes and scraps that can be covered with paper.
18. Photo safe pen. My favorite one to write with is the Precision Pen by American Crafts.

Thanks for visiting!
It's the most wonderful time of the year....

I've been keeping my eyes open for this since the Pumpkin Spice came out.
Me. Happy. Cup of Joe. Peppermint Bliss. :o)
October 24, 2010
Pumpkin Patch
October is a favorite of mine! I love how in this month it feels as if the weather has really changed to Fall, there's pumpkin treats to bake, Starbucks pumpkin spice latte (need I say more?!!), the excitement of Halloween, and my ultimate fav...............the trip to the "pumpkin patch".
We took that glorious trip to find our "tiny" pumpkins yesterday morning. I seriously could have taken a lot more photos but B & F got tired of walking around, so we called it a day. I'm loving the pictures that I did get though. It was simply a beautiful day to be outside!


We took that glorious trip to find our "tiny" pumpkins yesterday morning. I seriously could have taken a lot more photos but B & F got tired of walking around, so we called it a day. I'm loving the pictures that I did get though. It was simply a beautiful day to be outside!


Love their faces!

F was super excited to be there! Seriously great action photo!


Getting these two to sit together for a picture is not an easy task!

This was the "tiny" pumpkin F picked out!

Shots from the ground.....I just love how they come out!


He kept smelling/kissing this large white pumpkin, so funny watching him!

Our little family!
Thanks for visiting and come again soon!
October 12, 2010
Cardboard Album
A few weeks ago I was browsing the blog world when I came across this idea of using cardboard and scraps of paper to make a mini album. I loved the idea and knew exactly what I wanted to do for mine. Last year when we took the boys to the pumpkin patch I took a ton of pictures (you have to take a ton to get some good ones *wink*) There were so many good ones I wanted to give them a special place of their own.
This is my version of the "cardboard scraps album".........
 For this album I tore the cardboard into 5" x 7" pieces. Then covered both sides of all the cardboard pieces with scraps of cardstock. Then I used leftover pieces of patterned paper to decorate the pages. Added my photos and some embellishments, I also placed a few decorative tags in there for journaling. After punching holes in the sides, I used some twine to tie the pages together. Voila'.....the perfect way to display our pumpkin patch photos!


This is my version of the "cardboard scraps album".........


One of my absolute favorites of B & F!

Love this picture of our little family!


Out of all the projects and decorations I have out for Fall, this is my favorite one!
Be inspired to create something fun today!
Thanks for checking out my blog!
October 11, 2010
Trick or Treat.....
I've been in the process of putting together Halloween costumes (B & F are going to be the cutest little cowboys), decorating for Fall and trying to keep up with everything around here.
Anyway, I wanted to share with you a couple of projects I've been working on.
First up are the personalized "trick or treat" bags I made for B & F. I'm so happy with the way they turned out.

 These bags were fairly simple to put together if you're handy with a sewing machine. I wish I could take credit for the bag idea but I saw it somewhere in the blog world. The personalization part was all me though! lol For these bags I used orange felt for the bag and black felt for the jack o' lantern face. Black and white polka dot fabric for the personalized letters. Scraps of ribbon under the letters. Fusible web (this stuff is awesome) to attach the letters and J o' L face. I used two whole felt pieces for the front and back and cut 3 inch strips of felt to fit the sides and bottom of the bag and 2 inch strips to make the handles.
I'm just so thrilled with the way they turned out!


Anyway, I wanted to share with you a couple of projects I've been working on.
First up are the personalized "trick or treat" bags I made for B & F. I'm so happy with the way they turned out.


I'm just so thrilled with the way they turned out!


After having so much fun with the fusible web I decided to make them some Halloween t-shirts.
I can't wait to try them on B & F!


For the t-shirts I used plain black shirts from Target, more of the black and white polka dot fabric, fusible web and orange thread. For some reason I couldn't get the orange thread to show up very well in my pictures.
Thanks for stopping by to check out my latest projects!
Subscribe to:
Posts (Atom)